I kept scrolling past other people's bots on Janitor AI and thinking the same thing. I wanted one that sounded like it came out of my own head. So I decided to build a character from scratch and photograph every click on the way, and this walkthrough is that record.
By the end you will have watched a character called Elias Vane go from a blank form to a guarded stranger who greets me inside a rain-soaked library. I took a screenshot of every screen I touched, so you will see each field, what I typed into it, and the result it produced. If you have never made a bot before, you can follow my path click for click.
Most guides I found were long slabs of text propped up by stock images that no longer match the live site. I wanted the opposite. Every screenshot here is mine, taken on the current version of Janitor AI. I also left my mistakes in rather than editing them out, because one of them is instructive.
One note before the clicking starts. Janitor AI launched in 2023 and now shows more than 15 million users on its homepage. Its default model, JanitorLLM, is free, so nothing here costs money unless you later choose to plug in your own API, and I will point out where that choice appears.
Deciding who Elias is before the form
The most useful thing I did happened before I opened the creator.
I spent ten minutes deciding who Elias actually was. I wrote two lines in my notes app: calm, guarded, notices everything, hides a past he never discusses. Then I chose the scene I wanted every chat to open in, a library, late, a storm outside. That single decision shaped every box I filled in later, and you will see it echo through the personality field and the first message I write further down.
A weak sketch would have been one word, "mysterious." Mine gave the model four hooks to hang behaviour on before I had typed a single field.
Skipping this step is why so many bots feel flat. A blank form tempts you to type "a cool guy" and move on. The character I sketched on paper gave me something specific to paste in once the boxes appeared, and specific is what the model rewards.
Getting in the door
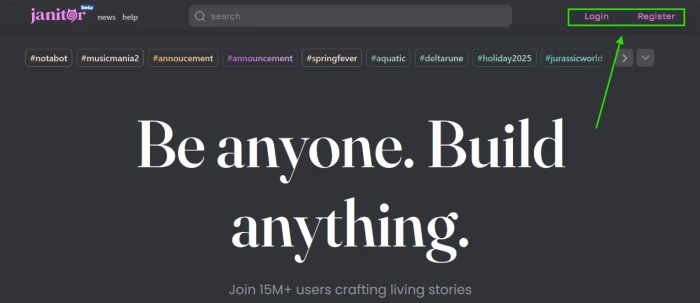
With the plan ready, I opened the Janitor AI homepage. The tagline reads "Be anyone. Build anything," which felt about right for what I was about to do. The Login and Register buttons sit in the top-right corner.
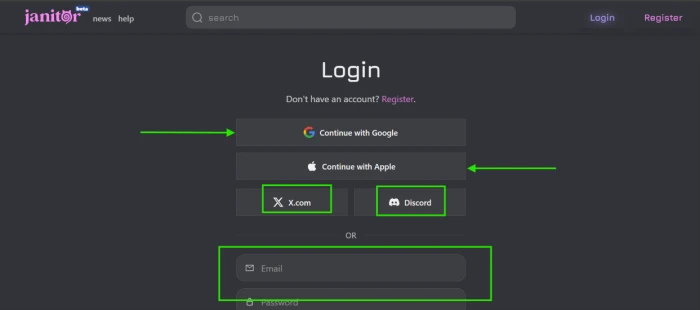
Registering took seconds. You can sign in with a Google or Apple account, and the panel also accepts X.com or Discord. If you prefer the old-fashioned way, an email and password option sits lower down the same box.
I used Google because it was the fewest clicks. Once you are in, the site drops you onto the main dashboard, which is where the next section begins.
Finding the Create button
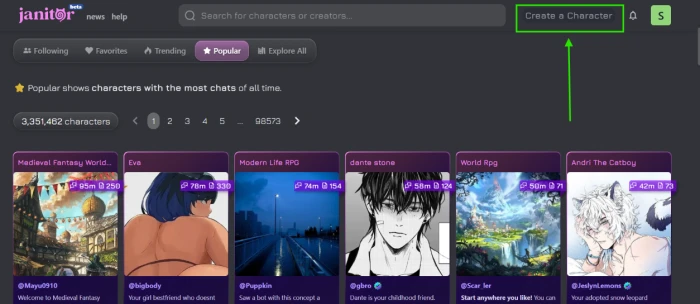
The dashboard is a wall of other people's characters. Following, Favorites, Trending, Popular, and Explore All run along the top, and the counter told me over 3.3 million bots were already live. The button I wanted, "Create a Character," sits in the top-right, in the same spot the Login button had occupied a moment earlier.
I clicked it and the editor loaded. Some browsers take a second or two to render the blank form, so do not worry if it looks empty at first.
The creation canvas and the avatar
The editor opens on a tab called General, shown in the left sidebar, with a live preview panel beneath it. Right then the preview held a placeholder image, waiting for me. The first field is the avatar.
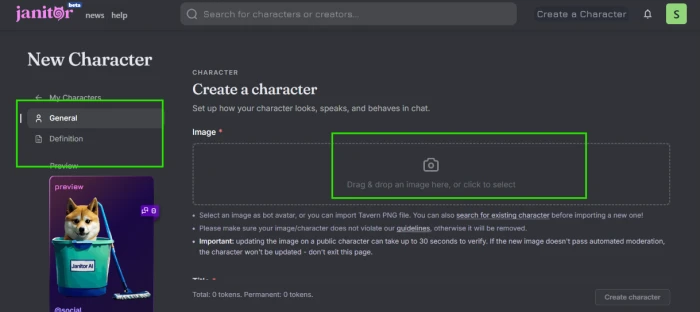
I dragged an image into the upload box. Two rules apply here. Your avatar has to be safe for work, and if you already own a character card from another app, you can import a Tavern PNG instead of starting fresh. That import is handy if you are migrating a bot from Character.AI or SillyTavern rather than building one cold. Janitor AI runs every image through a moderation check that can take up to thirty seconds, so I waited for it to clear before moving on.
Here is my one confession about this build, and I will come back to it properly at the end. The photo I first used did not match the character I had written. Keep that in the back of your mind.
The preview on the left updated the instant my image passed. Watching an empty card start to resemble a real profile was the point where this stopped feeling like paperwork.
Giving Elias a name and a bio
Scrolling down from the avatar, a short stack of text fields appeared. Rather than march through them in a paragraph, here is what each one does and what I entered.
| Field | What it controls | What I entered |
|---|---|---|
| Title | The headline on the character card that other users see | The Mysterious Stranger Who Knows Your Secrets |
| Chat name | The name the bot uses inside chats, also fed to the model | Elias Vane |
| Bio | The public introduction shown on the profile | A short paragraph about his calm nature and hidden past |
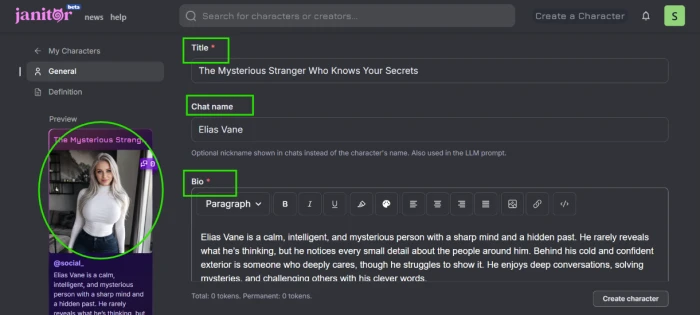
The Title and the Chat name do different jobs, which threw me at first. The Title is marketing, the hook on the card that makes someone click. The Chat name is functional, the name the bot answers to in conversation, and it also goes into the prompt the model reads. So my card advertises "The Mysterious Stranger Who Knows Your Secrets," while inside the chat he is simply Elias.
A flat title like "Elias" would have vanished in a list of three million cards. A promise gives a browser a reason to stop and tap.
For the Bio I wrote a few sentences that set his tone without giving the whole game away. Calm, sharp, alert to small details, warmer underneath than he lets on. The preview picked it up at once, and the card finally looked like something a stranger might open.
Tags and the Content Rating choice
Below the bio sit the Tags and a setting that trips up newcomers, the Content Rating.
Tags are how people find your character in search. You can add up to ten, each between 3 and 21 characters, letters and numbers only. A well-chosen tag is the difference between a character that surfaces when someone searches a genre and one that never gets found.
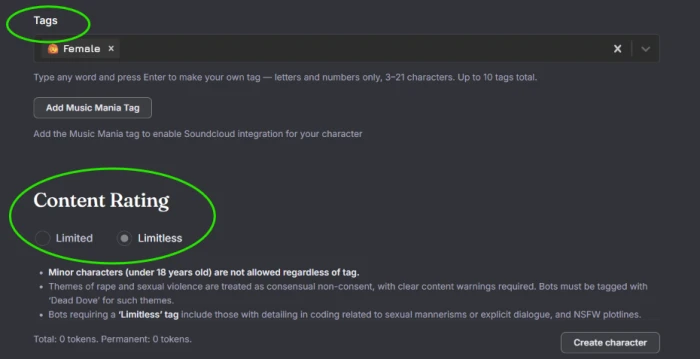
The Content Rating offered two options, Limited and Limitless. Limited keeps a bot in tamer territory. Limitless opens the door to mature themes, including explicit dialogue and NSFW plotlines, as long as they are tagged correctly. One rule sits above both settings and never bends: characters written as minors are banned regardless of any tag. Heavier themes such as non-consent also demand a specific "Dead Dove" tag and a visible content warning.
I picked Limitless for the flexibility. A wholesome mentor bot would sit fine on Limited.
The Definition, where the character actually forms
Everything up to now was setup. The Definition tab is where a character becomes a character, and it is where my ten minutes of planning paid off. The header calls this tab the heart of the character: how it speaks and what it knows.
There are four fields here, each with a specific job. I found them easier to grasp side by side, so here they are with what I wrote for Elias.
| Field | Its job | Elias, in short |
|---|---|---|
| Personality | The core traits the model leans on in every reply | Curious, hates betrayal, turns controlling when someone is in danger, wants closeness but fears it |
| Scenario | The situation each conversation opens inside | A quiet old library, late at night, mid-storm |
| Initial message | The bot's first message, which sets the length and tone of everything after | A described scene that ends on a challenge |
| Example dialogues | Sample lines that teach the bot how it should speak | A brief exchange in the user and char format |
Personality and Scenario
For the Personality box I expanded my two planning lines into a paragraph. I wrote that Elias notices what other people miss, that he hates betrayal yet respects hard honesty, that he turns cold and controlling the moment he thinks someone is in danger, and that beneath all of it he wants a real connection while being afraid of one. Specific beats vague every single time. "He is guarded" tells the model almost nothing. "He goes cold and controlling the second he thinks you are in danger" hands it a behaviour to perform.
I also gave him a habit the model could reach for, watching people closely before he speaks, so his replies would carry that same measured beat.

The Scenario box is shorter. I described the opening in two sentences: I meet Elias in a quiet old library late at night during a storm, the lights flickering as I hunt for a book tied to a mystery. That scene is the stage every conversation walks onto.
You can spot the token counter climbing in the corner of that screenshot. I will explain those numbers shortly, because they carry more weight than they seem to.
The first message and example dialogues
If you take one idea from this entire guide, take this. The initial message decides how good every later reply will be. A short, lazy greeting trains the bot to answer in short, lazy sentences.
So I gave Elias a proper entrance. He sits at a wooden table turning the pages of an old book, does not look up, says "You're late," then studies my face and tells me he knew I would come. It closes on a hook: "So tell me, are you actually ready to discover the truth, or will you run away when it gets dangerous?" That question asks for a real answer, which pulls a longer reply out of me and keeps the scene moving.
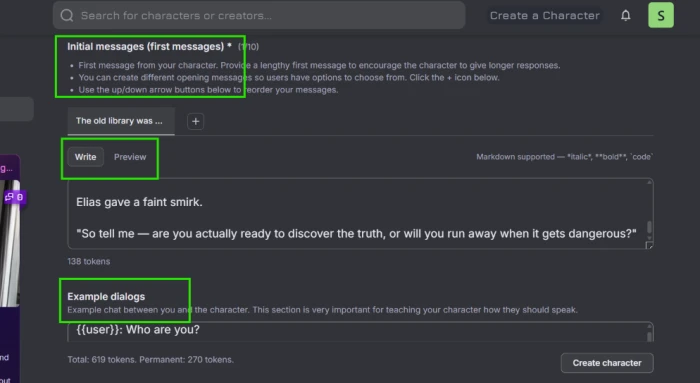
Underneath sits the Example dialogues box. This teaches the bot its voice by showing a sample back and forth between the user and the character. Janitor AI uses a simple format, with {{user}} marking my lines and {{char}} marking his. Even one short exchange nudges the model toward the rhythm you are after.
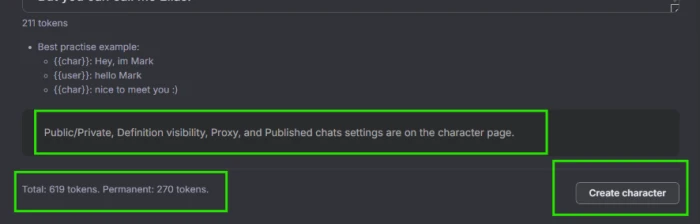
At the bottom of the screen, the "Create character" button waited. Before I pressed it, those token numbers earned a closer look.
A quick word on tokens
Tokens are the character's memory budget. Every word you write in these boxes spends tokens, and the model can only hold so many at once. The editor splits the count into a running total and a "permanent" figure, and the permanent number is the one that stays loaded in the bot's memory during a chat.
My build sat at 270 permanent tokens by this stage, roughly a couple of short paragraphs, which is comfortable. The rule of thumb around the community is to keep permanent tokens well under a couple of thousand so the model retains all of them. Cram in a thousand-word backstory and the earliest details start dropping out of memory as the conversation grows.
Write enough to define the character, then stop before you bury the model.
Hitting Create and choosing who sees it
With every box filled, I pressed "Create character." The token summary sat right beside the button, one last reminder of how heavy my definition had become.
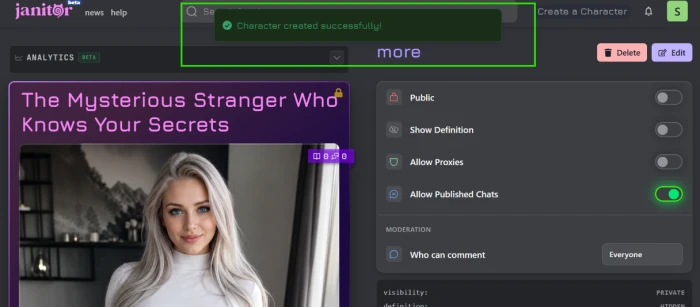
A green "Character created successfully" banner slid across the top. Elias existed.
Creating him was not the final decision. The character page carries a row of toggles that decide who can reach him, and the defaults deserve understanding rather than a shrug.
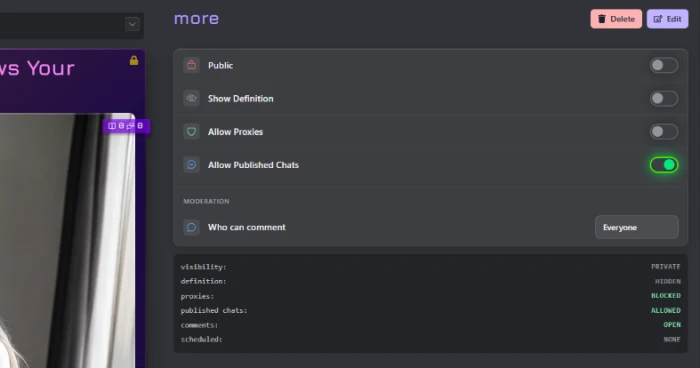
The readout at the foot of that screenshot sums up his state at a glance:
- Public is off, so his visibility is Private and I am the only one chatting with him while I test.
- Show Definition is off, which keeps my personality text hidden from other users.
- Allow Proxies is off, meaning he runs on Janitor's own model rather than an outside connection.
- Allow Published Chats is on, so I could share a transcript later if I wanted to.
- Comments are open to everyone.
I left most of these alone. Private plus a hidden definition is a sensible way to test a bot before letting anyone else in.
Meeting Elias for the first time
This was the payoff. His profile now showed the bio I wrote and a "by: @social_" line crediting me as the creator. A button underneath read "Chat with Elias Vane."
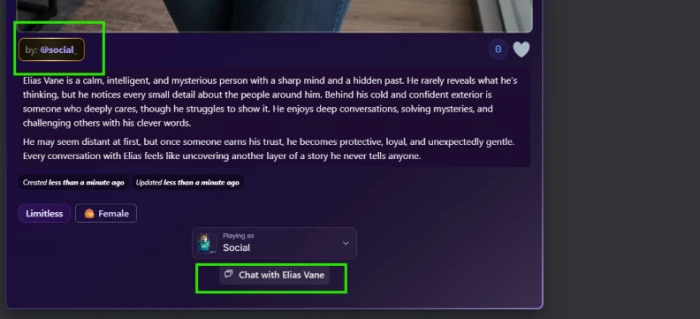
I pressed it.
His opening message landed word for word as I had typed it into the initial message box earlier. The library, the rain, "You're late," the book slid across the table toward me. Seeing text I had pasted into a form come back as a character speaking to me was the moment the whole build clicked into place.
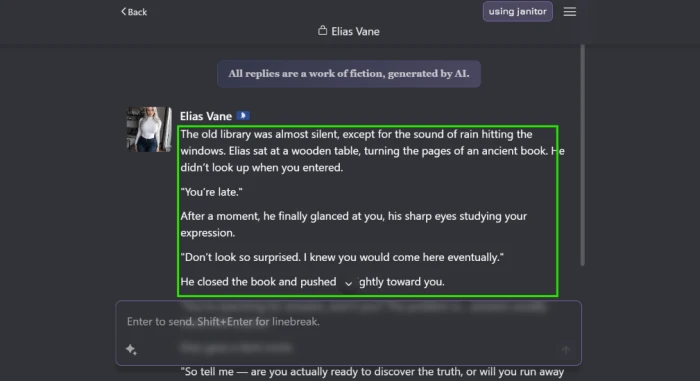
A small "using janitor" label sat in the top corner, confirming he was running on the free JanitorLLM model, and a banner reminded me that every reply is fiction generated by AI. I typed a first reply to test him, and he answered in the same guarded register, holding character instead of slipping into a generic chatbot voice.
Customizing the chat afterwards
One thing I had not expected: a character is not locked once it is made. Inside the chat, a menu in the top-right corner opens a set of tools for adjusting the experience.
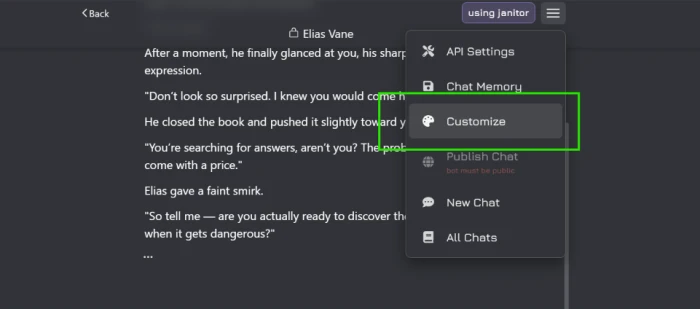
The menu holds API Settings, Chat Memory, a Customize option, Publish Chat, a New Chat button, and All Chats. Customize is the one I reached for, since it changes how the chat looks and behaves without rebuilding Elias from zero. Chat Memory, just above it, is worth knowing about for long roleplays, since it helps the bot hold on to details from earlier in a conversation.
API Settings is where you would head if you ever want to swap the free model for your own OpenAI or Claude key, the paid route I flagged at the start. For a first character, the defaults were plenty.
The mistake I want you to skip
Now the confession I promised back at the avatar step.
Look closely at Elias across these screenshots and you will catch it. The avatar is a photo of a woman, and the tag I set reads Female, yet Elias is written throughout as a man. Nobody stopped me. The form accepted all of it.
It did not break the bot. It does make the card confusing, and a reader hunting for a male character would scroll straight past a face that does not fit. People following a tutorial tend to copy its errors along with its steps, so learn from mine: choose an avatar that matches the character you wrote, and set the tag to the gender you gave them. Two ten-second fixes that keep the profile honest.
That single inconsistency is the one thing I would redo. Everything else about the build held the moment Elias looked up from his book and told me I was late.
Final Thoughts
The clicking took me about five minutes. The thinking took the ten before it, and that ratio is the whole lesson.
Janitor AI hands you a form that anyone can fill, so the tool is not what makes a bot worth returning to. Your writing is. The name and the avatar get someone to tap, but the personality and that first message are what make them stay, and both come out of the planning you do before the editor is even open.
If you build Elias alongside me and he feels stiff on the first try, do not scrap him. Open the chat, watch where he breaks character, then go back into the Definition tab and tighten the line that let him slip. Mine took two passes before he sounded right. Treat the character as a draft you keep editing after it goes live.
Comments
Join the discussion and share your perspective.